Web designers and site owners need a secure space to test new themes, plugins, or major updates before applying them to a live site. Creating a staging environment prevents errors that could crash your main site, and with the help of the WordPress Toolkit in cPanel, this process is fully automated.
Important notes before you begin:
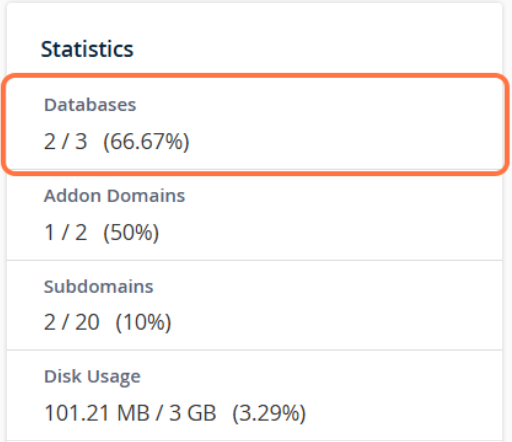
Disk Space: Cloning creates an exact copy of your site, which means you must have enough free space on your hosting account (at least as much as your current site occupies).
Database Limit (START package): During cloning, WordPress Toolkit automatically creates a completely new database. If you are using our START package (which has a limit of one database), the system will report an error: "You do not have enough resources to create a new database." Be sure to check how many free database slots you have left. To use the staging option, an upgrade to a higher hosting package may be required.
If you haven't installed WordPress on your main domain yet, please first read our guide Installing WordPress using WP Toolkit.
Step 1: Launching the Cloning Tool
The great thing about WordPress Toolkit is that you don't need to create a subdomain in advance – the tool will do it for you.
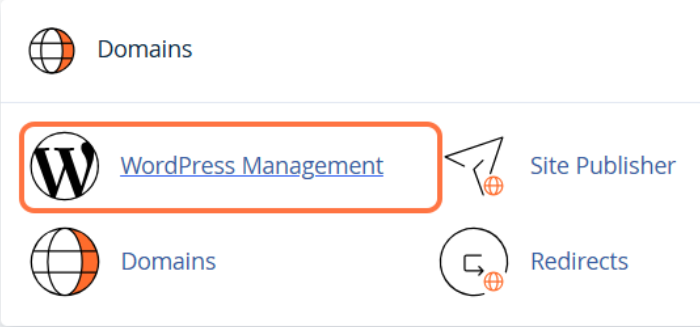
Log in to your cPanel account following this instruction and open WordPress Management.
In the list of installations, find your main site (e.g., example.com).
On the dashboard of that installation, click the Clone option.

Step 2: Setting up the Staging Address
A settings window will open where you choose where your test site will be located.
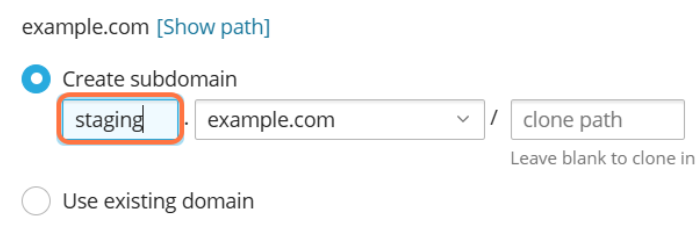
In the Location section, under the Target option, select Create subdomain.
In the first empty field, enter the desired prefix, for example "staging" or "test" (so the full address of your test site will be staging.example.com).
Leave the clone path field empty.
Click the Start button at the bottom of the window. The system will now automatically create the subdomain, copy all your files, and set up a new database.
Step 3: Working in the Staging Environment and Pushing Changes (Push to Live)
Once the process is complete, you can safely log in to the test site (e.g., via staging.example.com/wp-admin) and freely test all changes. Your main site will continue to function normally during this time.
When you're finished and want to move successful changes to the live site:
Open WordPress Toolkit again.
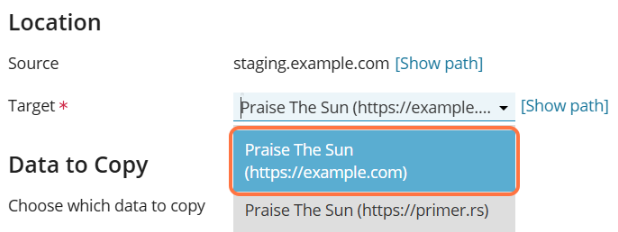
Find your staging installation (staging.example.com) and click the Copy Data option.

In the new window, in the Target section, select your main site from the dropdown menu.
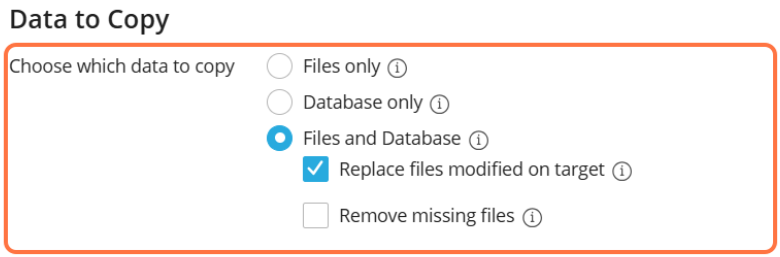
In the Data to Copy section, choose what you want to transfer:
Files only: The safest option if you only changed the design, theme, or added plugins.
Files and Database: Choose this if you also changed settings within the database.
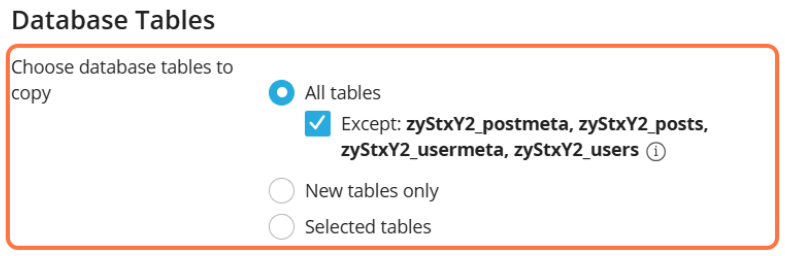
Smart Database Protection (Database Tables): If you copy the database, you will notice that under the All tables option, the field Except: postmeta, posts, usermeta, users is automatically checked. This is a brilliant built-in feature! It prevents your new blog posts, new users, or WooCommerce orders on the live site from being deleted or overwritten by old data from the staging site.
In the Restore section, the Create a restore point option is automatically checked. Leave it enabled – the system will create a quick backup before transferring data, just in case something doesn't go as planned.
